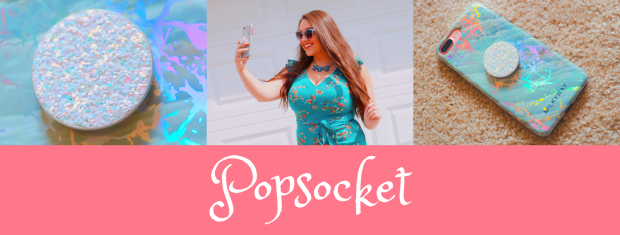
Who else is a Popsocket junkie!? I have to say that when they first came out, I thought they were stupid. Not as stupid as the selfie stick but pretty stupid. But once I received onefor Christmas, I figured I’d give it a try. Well let me tell you, I’vebeen hooked ever since! Having a Popsocket has made my texting, selfies, car mounting, and more a million times easier. Which is why I had to get on here and share with you all my Go-To Popsocket! My absolute favoritePopsocketI have owned is from the original Popsocket brand and it’s called “Sparkle Snow White”. It has an iridescent Glitter on it and makes for a perfect accessory to my holographic phone case from Milkyway. My only complaint about it is that they Glitter does fall off eventually. Regardless, this brand has a ton of super cute options and you can find a good amount of them on Amazon withprime. I linked the photo above to the specific Sparkle Snow White Popsocket on the official site. If you drop your phone a lot or your hand gets tired frequently from holding you phone, especially if it’s a Plus, check out getting a Popsocket. You won’tregret it!
Wow friends, I can’t believe I almost forgot to post a Go-To Tuesday! This whole holiday weekend has had me thrown off and I thought that today was Monday until a half hour ago (haha). But that’sokaybecauseI’m here and ready to show you my go-to tight hold hairspray! Bed Head Masterpiece Shine Hairspray has been my recent find and favorite. I was given a travel sized version for Christmas this past year and immoderately became obsessedwiththe way it made my hair smell and feel. The scent is so delicious that I kept sniffing around thinking that whatever that scent was I wanted to eat it. I ended up figuring out it was my hair and I sniffed it for the rest of the night. My boyfriend also commented on how well it smelled and I knew that this was gonna be my new go-to. Not only is the scent amazing but the hold it gives my hair is amazing. I rarely need touch ups after Ifinish using this product. My only complaint is that it is a little pricy for hairspray at some stores BUT I’ve bought this at Marshall’s for $10 and have seen it at other stores similarly priced. Definitely explore all your options for prices before purchasing the oneI have linked to the photoabove (from Ulta: $23). Let me know if you’vetried this hairspray and what you think in the comments below!
Welcome back friends or if you’re new, welcome! Today, I’ve decided to share with you all my skincare routine. Since there are multiple times you take care of your skin during the day, I decided to break it down in different blogs. This edition will be focused directly to my night time routine. I do not have perfect skin by any means (especially during my time of the month) so you will definitely see some blemishes in my video. But no one is perfect and I’m working on a better version of myself every day. So join me on achieving better skin for ourselves! I’ve been lucky enough to find products that I’ve been loving recently and it’s been making me want to commit to my skincare routine more frequently. I’m so excited to share with you some of these products because they make my skin feel so amazing afterwards. So, let’s get to it!
Video:
Product Breakdown:
(Photos are the links to the products)
Step 1- Grab a headband, whether it’s a terry cloth spa headband or just a casual plastic one. This is totally optional but I do it because I hate having wet hair around my face.
Step 2- *if wearing makeup* Grab your makeup wipe and wipe off all excess. Don’t scrub at the places that don’t wipe off easily, we’ll handle those places in our next step.
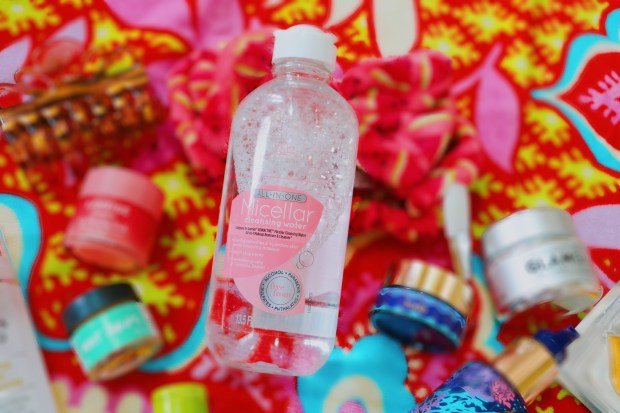
Step 3- Grab your Micellar Cleansing Water and pour some into your cotton pad. Then wipe excess makeup residue and those harder to get makeup areas (mascara/eyes, long lasting lipstick, etc) off. If you’re not wearing makeup, this cleansing water clears the face of all impurities before washing it. I’m going to link the one I used in the video to the photo above and the other option here. I’m also going to link another one that can be found at Walmart, Walgreens, Target, etc. They both do the same thing and I like either one.
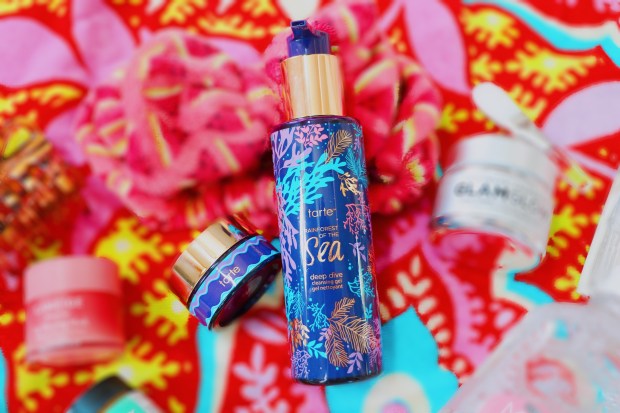
Step 4- I grabbed my rubber face scrubber (I’ll link here) and applied the Tarte Rainforest of the Sea Deep Dive Face Cleanser. Once I’ve finished, I rinse my face off and pat dry.
Step 5- Then I grab my Tarte Rainforest of the Sea Drink of H2O Hydrating boost. I dab a penny size of product onto my finger and distribute it over my entire face. Make sure that you use your fingertips to gently blend the product into your skin.
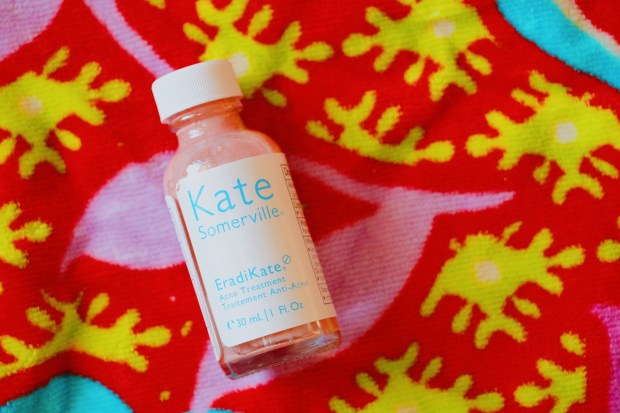
Step 6- I finish off my night time routine with this new product I’ve started using recently. It’s the Kate Somerville EradiKate Acne Treatment which helps with pop up blemishes. I’m curious to see how well it works and will definitely let you all know my results with it in the future.
And it’s that simple. This whole routine takes about 10 minutes max! Stay tuned for my morning skincare routine and my favorite masks and more coming up soon in future blog posts. Let me know what you’d like to see if the comments below. Until next time,
Another day, anotherTuesday and we are here to take a look at my go-to umbrella! You may be thinking, who has a go-to umbrella? WellI sure do! When it comes to summertime and the unpredictable weather, I always have an umbrella in tow. Not just any umbrella though, I carry with me a Vera Bradley Umbrella. Now, this $40 umbrella may seem ridiculously priced to you, and trust me it is to me too. BUT you can find these on sale and at the Vera outlets for as low as $12. What is so great about this umbrella? Well, for starters, I’ve had my first Vera umbrella for 7 years and it is STILL in great condition. I’ve used it countless summers traveling to DisneyWorld, amusements Parks, beaches, and more. I just recently purchased a new one becauseIloved the design and thought it would be a good idea to get a backup just in case. That’s how much I love this umbrella. I have a backup to make sure I don’tgo without it. This umbrella has a button that allows the umbrella to pop open, a snap that holds it closed together when not using, and a slide on cover to store it compactly. If this is something you want to purchase but don’t want to spend the full $40 on, Vera Bradley offers a lot of coupons for people that sign up for their email chain. There’s also a nice birthday coupon they send out that could give you a great discount off. Whatever way you can get it, I highly suggest you do. If you want to stay dry and stylish this summer, then this is the umbrella for you!
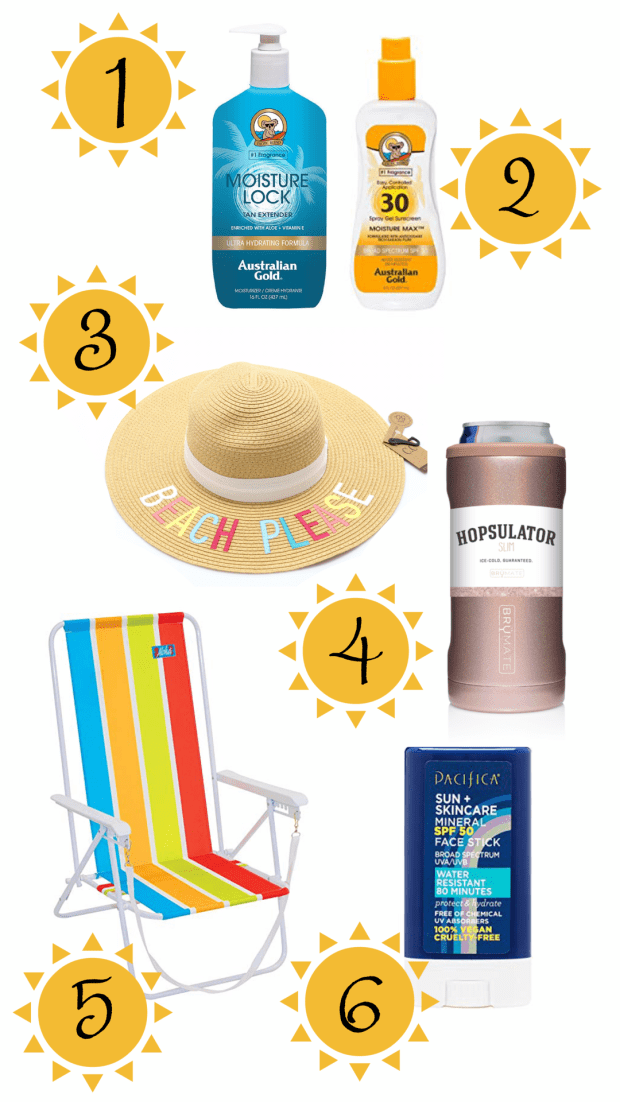
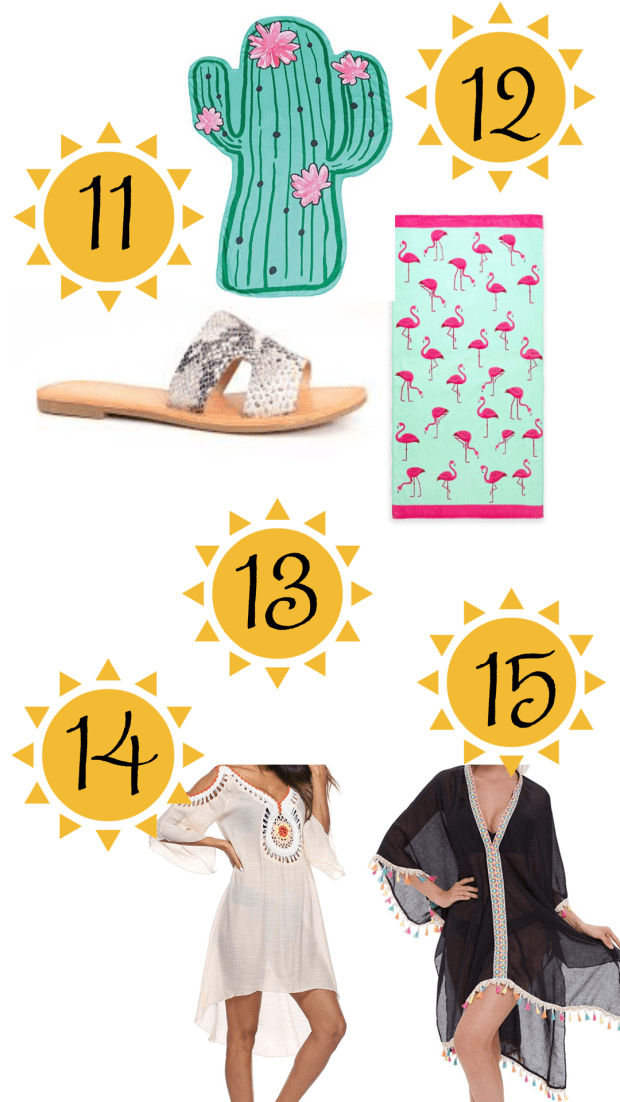
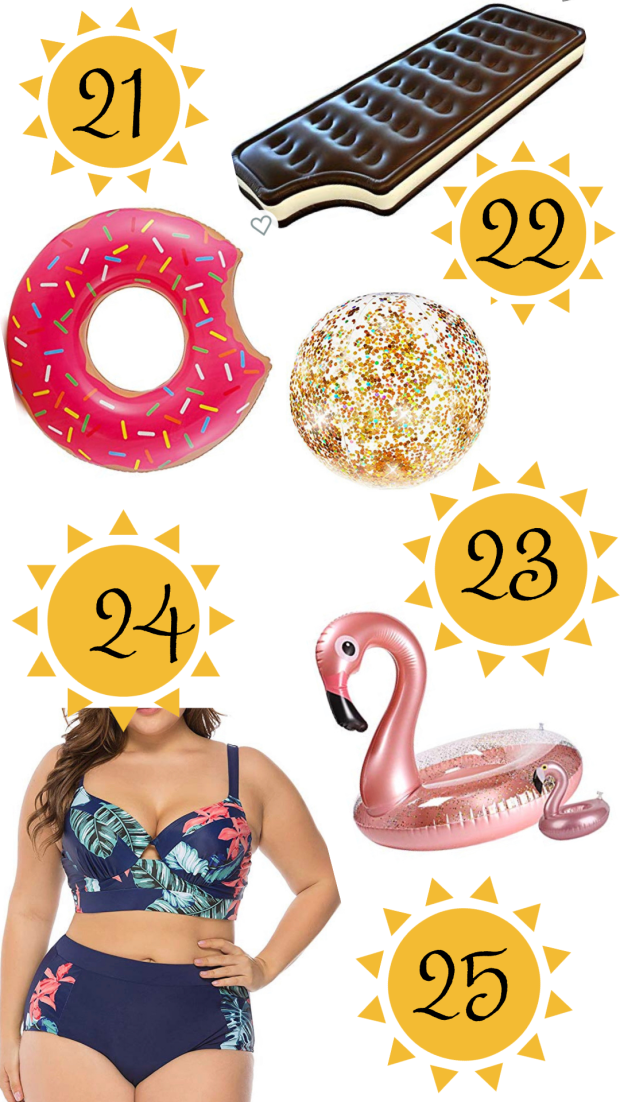
Summer vacay is upon us friends! I’m so excited to be able to go to the beach and relax for bit, how about you? Well, check out these adorable finds from Amazon that would be perfect addition to making your trip the MOST fabulous. Here’s the best part, all of these products are under $30 AND Prime! So what are you waiting for? Start shopping now!
When applying our makeup, it is so important to have the right tools to pull the whole look together. Makeup brushes may seem like your last priority to buy but when it comes to a brush like this, it’s worth the buy. That’s why I use the Sigma F8 Flat Kabuki Foundation brush. This brush leaves an amazing finish to my foundation. It’sspreads it very easily and itdoesn’t absorb a ton of the product. Before I used this brush, I always felt like my foundation was just absorbed into sponges and brush and I never got the full amount onmy face. This brush distributes the amount of foundation that I intend for my face. The flat top to this kabuki also insured that the foundation isn’tstreaky when applied. This brush is about $25 and definitely worth the price. If you purchaseon the site for the first time you can receive a discount code, which is what I did when I first purchased it. Try this brush out, trust me, you’ll be hooked!
Today I’m excited to finally share with you this look. I’d like to think of it as a subtle glam makeup look! Who doesn’t love to try and be glam in any situation? Well this look will help you create it in a subtle and gorgeous way. Follow along below on the products I used and a step by step on how to create this look. Follow along with the video if you get stumped on any of the steps. Trust me, if I can do this, anyone can! 😁 let’s get to it:
Next we grab our Creaseless concealer (33N Medium) and apply it to all the places you want to highlight on your face. Check out my video if you’re not quite sure exactly where to place your concealer. After that you want to grab your Hard Candy Highlight and Contour stick (Medium- you can also use this highlighter if you don’t have a concealer that is lighter that your foundation) and apply to the places you want to contour. Again, I have included a video above that will show you places that many people tend to place their highlight and contour. Do what works best for your face! Once you’ve placed that in your desired areas, take your beauty blender and blend those into your foundation.
Next I grab my Covergirl Professional Loose Powder (Light Translucent) and dip my beauty blender into it. I then “bake” my face by applying the powder on the places that I highlighted my face with the concealer. Typically, your concealer is sticky and tacky so the loose powder helps set the product for a long days wear. Tip: if you can see the powder on your face, you’re doing it correctly. Don’t blend into your face… yet! We’ll get there, just let the face “bake”, hah get it now?
While I wait for that to dry and set, I grab my NYX Micro Brow Pencil (Brunette) and outline my eyebrows very lightly (watch video to see how I did it exactly). After I use the Pencil, I grab my Busy Gal Brow Tint (brunette) and fill in my brows with this product. To finish off my brows, I grab the Ardell Brow Sculpting Gel and apply this onto to my brows to even out the product/set it.
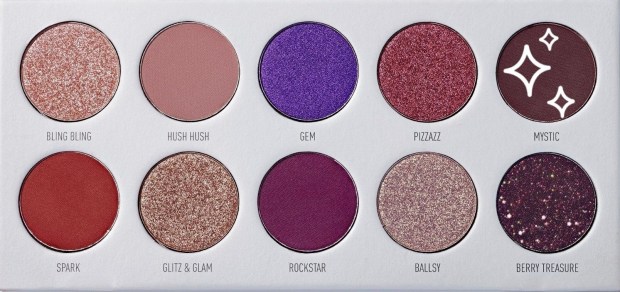
Now here comes the fun part, eyeshadow! Grab your Bling Boss Eyeshadow Palette and dip your fluffy brush into “Hush Hush” and blend it into your crease.
Next dip a more dense brush into “Mystic” and lightly apply this to your outer corners. BLEND WELL!
After that, dip another brush into “Ballsy” and apply to your inner corner out towards your last color application. Blend those colors together.
Last, dip your finger into “Bling Bling” and apply this color to your brow bone. This helps give a little pop of shimmer to your brow area.
After eyeshadow application is finished, go back with a fluffy brush and brush off that excess loose powder that we were “baking” with.
Now, onto those luscious lashes ladies! Grab your House of Lashes Siren Falsies (or any pair your have laying around) and use your Ardell Lash Adhesive to apply to your lashes. While letting your lashes dry and set, grab you Morphe Color Pencil Eyeliner (Dark Room) and apply on lash line. Then take your NYX Wonder Pencil (Light) and place on your waterline.
This is the perfect time to apply blush and highlighter (which I didn’t feature in this video). I have a blush and highlighter palette that is quite similar to this Lorac one (I would use Blossom on cheeks & Opalescent as a highlighter).
Last but not least, what fun is doing your makeup and getting all dolled up without lipstick? Grab your Wet n Wild Megalast Liquid Catsuit Lipstick (Berry Recognize) and apply this gorgeous color to your lips. FYI: my dancers use this color for their dance competitions and the color looks amazing on every skin tone! I highly recommend this product if you’re looking for a great vibrant color that isn’t a red.
And that’s it! This look usually takes me about 35/40 minutes to accomplish this fully look, which may seem like a lot of time to some people. I think it depends on your pacing and allotted time but it could probably be done in a half hour. If any of these steps are new to you they may take a little longer to do at first. Thank you so much for following along though. I’ve had a lot of fun creating this video for your all and hope you enjoy. Let me know if there’s any specific palettes you’d like to see tutorials with or certain products that you’d like to see me use next!
It’s time for me to come on here and share with you one of my best kept secrets.. well I don’t know if I can consider it a secret BUT, I absolutely LOVE this product. It is the Impress Press On Manicure. So what is different about these particular ones? Well I’ll tell ya. First off, the nails come in two different lengths, short and long. The short ones are the perfect length in my opinion. I don’t care for nail length that is too extremely long so these short nails are perfect for me. The second thing I love about them is the fact that they have stickers on the back. No glue is needed to apply these nails. All you have to do is peel the sticker and apply them to the desired nails. Lastly, It comes with 30 nails, in all shapes and sizes which means you can wear you package more than one time. These are so affordable that you have to try them out at least once! Let me know what you think about them.
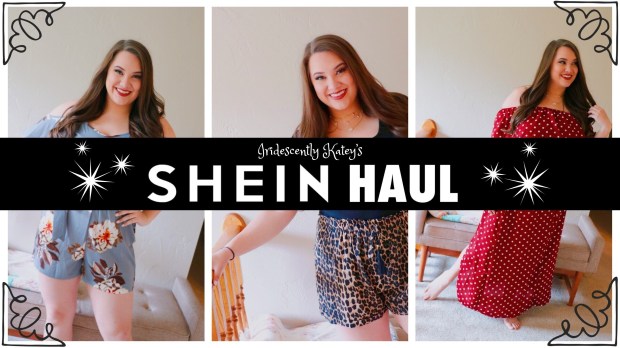
It’s finally here, my SHEIN haul! I’m so excited to share with you guys these adorable pieces I got in from SHEIN recently. I was pretty pleased with my purchase especially for the price I spent. So let’s get to it:
Video Haul
The Outfits
Off Shoulder Polka Dot Top with Split Skirt (Plus)– First outfit is this ADORABLE set. When I ordered this I had no expectation for this outfit. I have to say that this outfit is more than I could ever have given it credit. It’s super flattering and comfortable. My only complaint about this outfit is the ruffle at the top. It’s actually a separate piece from the tub top that is under it. I thought that was a little strange and I think I’m gonna try to stitch it to the tube top somehow. Other than that, I adore this outfit and can’t wait to wear it out and about. I ordered a 1X for this outfit. If you’re interested in this set and would like it in the normal sizes, click here to access it.
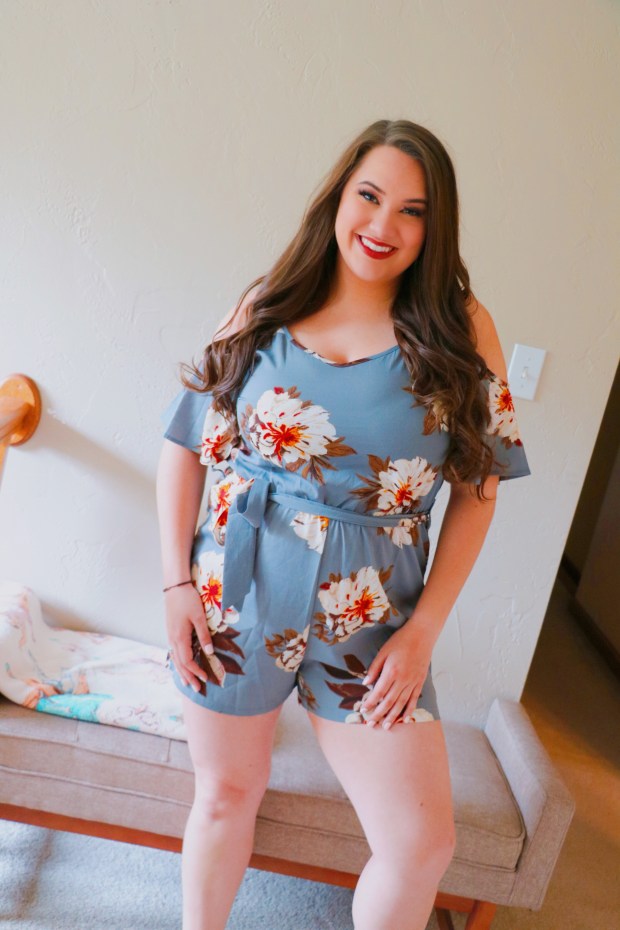
Floral Print Cold Shoulder Romper (Plus)– So the next outfit is this trendy little romper. I was most excited to get this outfit in and try it on because it looked so cute on the model. I gotta say this is everything I hoped it would be! In the past, I’ve struggled with finding rompers that were long enough to fit my torso and boobs but this one was a perfect fit. I ordered the 1X for this romper. If you’re interested in this romper in smaller sizes, they have a similar one and I’ll link it here.
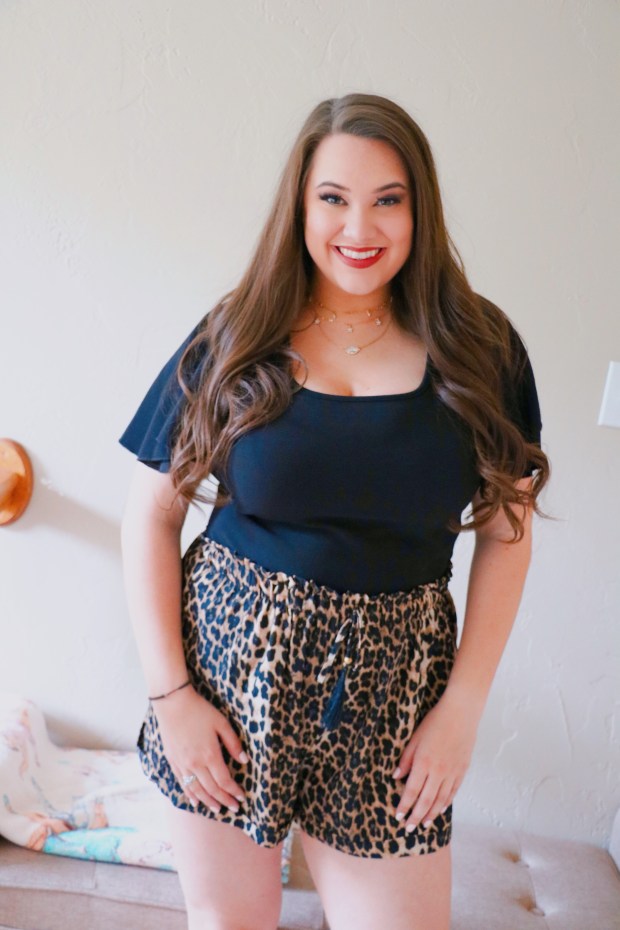
Flutter Sleeve Top (Plus)– This top I have on was such an affordable price and amazing quality. It’s such a flattering style and paired so well with these adorable Cheetah Print Drawstring Shorts (Plus). I order a 1X in the shorts and a 0X for the top. I paid less than $20 on these two pieces and I love this simple but super cute outfit. You guys are going to see me wearing this a lot this summer! Haha Below I have attached a similar Flutter top and Cheetah bottoms that are in the regular sizes if you’re interested.
Eye & Star Detail Layered Chain Necklace– I’m so obsessed with this necklace! I’ve had my eye on a few of these layered necklaces and this one was super cheap. I couldn’t pass it up! I also purchased the Star Charm Layered Chain Necklace but that broke before I even put it on. I figured how to still wear it broken so I wore it for one day and then it broke completely. So the second one is completely unwearable but this one has held up so far. I’ll keep you all posted if that one ends up breaking on me too though. But so far so good and it looks super cute.
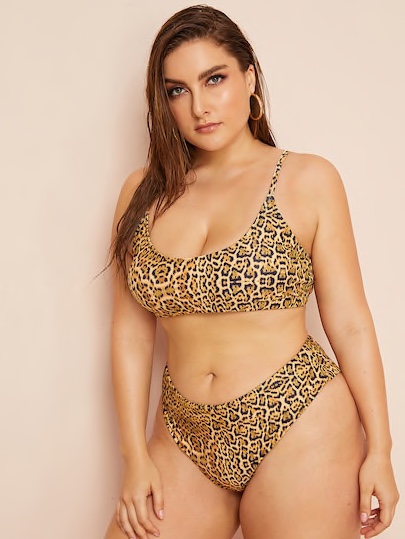
Leopard Print Top with High Waist Bikini (Plus)– This bathing suit is sold as a set so to be able to pull it off you have to wear the same size in your bottom and top. Unfortunately, I need a bigger size in my top than I do for my bottom so this top was way too small for my boobs. The bottoms fit nicely though and I ended up buying a black bathing suit top from Aerie to pair with it so I’ll feature that for you on the Instagram when it gets a little warmer out. I really wish that the whole set fit though because the print is sassy and I love it. I definitely suggest it if you can work the same size top and bottom!
Overall, I’m very pleased with my recent purchase with SHEIN and I’ll definitely continue shopping with them in the future. What do you guys think of SHEIN? Are you a fan? Let me know in the comments!
Today we are talking about my Go-To Purse! I gotta say that I’m a gal that likes to switch it up a bit when it comes to purses BUT ever sinceI’ve got this purse, I keep going back to it. It’s the perfectsize to fit all my essentials and so easy to throw over my shoulder and go. This is a Kate Spade Black crossbody purse and I’ve had this one for about 3 years now. The leather has barely any imperfections on it after having it all this time. Unfortunately, they don’t make the same style that I own anymore but below I have attached some that are of similar style and color as mine.
I’m in love with the third one featured and almost bought it a couple of weeks ago. The only reason I didn’t is because I love the one I already have. So I ended up getting something that was different from what I already have. So if you’re in need of a nice, sturdy, fashionable crossbody, check out these options. They are totally worth the splurge!