Welcome back y’all,
Today I’m excited to finally share with you this look. I’d like to think of it as a subtle glam makeup look! Who doesn’t love to try and be glam in any situation? Well this look will help you create it in a subtle and gorgeous way. Follow along below on the products I used and a step by step on how to create this look. Follow along with the video if you get stumped on any of the steps. Trust me, if I can do this, anyone can! 😁 let’s get to it:
Products:
How-To Video:
Step by Step Turotial:
- We begin with applying the NYX High Definition Primer all over the face.
- Then we take the NYX Total Control Drop Foundation and Farsali Rose Gold Elixir (I tagged the mini but the regular size is EXPENSIVE! Haha) and apply that all over your face. I apply it with a foundation brush (I prefer the Sigma F80 brush) and then you want to take a beauty blender and blend it all in.
- Next we grab our Creaseless concealer (33N Medium) and apply it to all the places you want to highlight on your face. Check out my video if you’re not quite sure exactly where to place your concealer. After that you want to grab your Hard Candy Highlight and Contour stick (Medium- you can also use this highlighter if you don’t have a concealer that is lighter that your foundation) and apply to the places you want to contour. Again, I have included a video above that will show you places that many people tend to place their highlight and contour. Do what works best for your face! Once you’ve placed that in your desired areas, take your beauty blender and blend those into your foundation.
- Next I grab my Covergirl Professional Loose Powder (Light Translucent) and dip my beauty blender into it. I then “bake” my face by applying the powder on the places that I highlighted my face with the concealer. Typically, your concealer is sticky and tacky so the loose powder helps set the product for a long days wear. Tip: if you can see the powder on your face, you’re doing it correctly. Don’t blend into your face… yet! We’ll get there, just let the face “bake”, hah get it now?
- After I’m finished applying the setting powder, I grab my Urban Decay Eyeshadow Primer Potion to set my eyes before applying eyeshadow.
- While I wait for that to dry and set, I grab my NYX Micro Brow Pencil (Brunette) and outline my eyebrows very lightly (watch video to see how I did it exactly). After I use the Pencil, I grab my Busy Gal Brow Tint (brunette) and fill in my brows with this product. To finish off my brows, I grab the Ardell Brow Sculpting Gel and apply this onto to my brows to even out the product/set it.
- Now here comes the fun part, eyeshadow! Grab your Bling Boss Eyeshadow Palette and dip your fluffy brush into “Hush Hush” and blend it into your crease.

- Next dip a more dense brush into “Mystic” and lightly apply this to your outer corners. BLEND WELL!
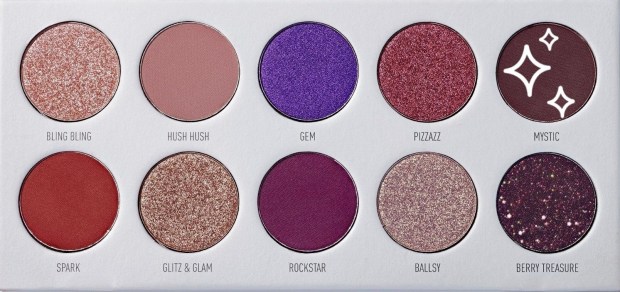
- After that, dip another brush into “Ballsy” and apply to your inner corner out towards your last color application. Blend those colors together.

- Last, dip your finger into “Bling Bling” and apply this color to your brow bone. This helps give a little pop of shimmer to your brow area.

- After eyeshadow application is finished, go back with a fluffy brush and brush off that excess loose powder that we were “baking” with.
- Before we can move onto lashes, we have to grab our Maybelline Line Stiletto Liquid Eyeliner and create a low key cat eye look.
- Now, onto those luscious lashes ladies! Grab your House of Lashes Siren Falsies (or any pair your have laying around) and use your Ardell Lash Adhesive to apply to your lashes. While letting your lashes dry and set, grab you Morphe Color Pencil Eyeliner (Dark Room) and apply on lash line. Then take your NYX Wonder Pencil (Light) and place on your waterline.
- This is the perfect time to apply blush and highlighter (which I didn’t feature in this video). I have a blush and highlighter palette that is quite similar to this Lorac one (I would use Blossom on cheeks & Opalescent as a highlighter).
- Last but not least, what fun is doing your makeup and getting all dolled up without lipstick? Grab your Wet n Wild Megalast Liquid Catsuit Lipstick (Berry Recognize) and apply this gorgeous color to your lips. FYI: my dancers use this color for their dance competitions and the color looks amazing on every skin tone! I highly recommend this product if you’re looking for a great vibrant color that isn’t a red.
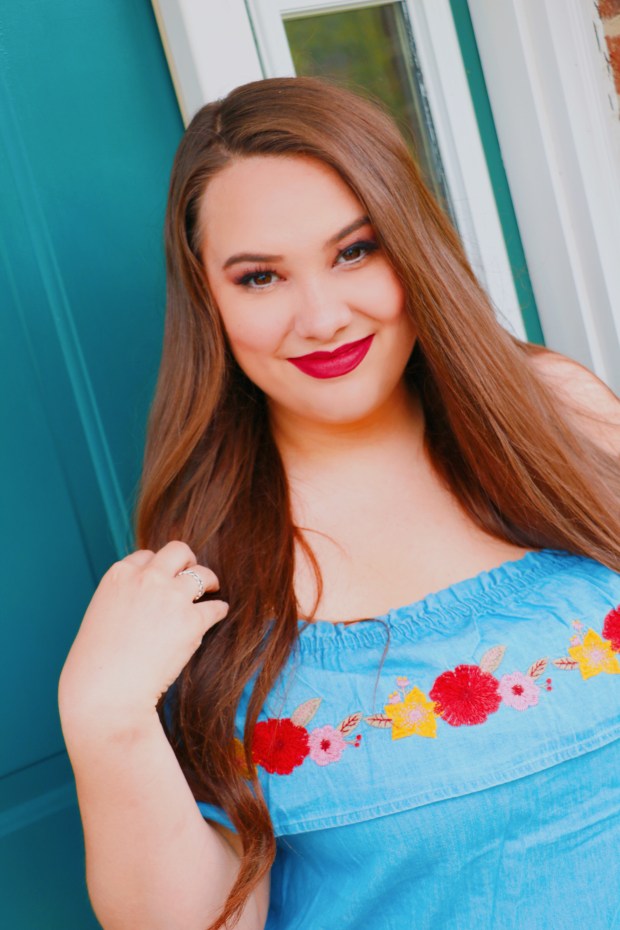
And that’s it! This look usually takes me about 35/40 minutes to accomplish this fully look, which may seem like a lot of time to some people. I think it depends on your pacing and allotted time but it could probably be done in a half hour. If any of these steps are new to you they may take a little longer to do at first. Thank you so much for following along though. I’ve had a lot of fun creating this video for your all and hope you enjoy. Let me know if there’s any specific palettes you’d like to see tutorials with or certain products that you’d like to see me use next!